Showing posts with label Recipe. Show all posts

Saturday, August 30, 2014

A Recipe for Blackberry, Apple & Almond Cake...

The end of summer is nigh... The sun streaming through the window has changed from the stark, bright light of high summer (highlighting my cleaning imperfections) to bathing everything it hits in a golden hue. My mind is slowly turning from salads to comfort foods. This year, I feel more than ever that fall is just around the corner. After a mild summer, I'm already seeing the leaves change colour and, in some cases, slowly falling onto my overgrown, raggedy garden.
The produce of fall is gradually making an appearance at the local farmers market too... squashes, blackberries and, today, apples from upstate New York, piled high at the entrance...
Now, I'm on a bit of a baking kick at the moment, and so, I decided to bag me up some apples, pick up a punnet of blackberries, and tootle back home to make my favourite fall cake... Apple, blackberry, and almond cake...


Mmm... What a delicious combination (although I could add almonds to anything and an instant love affair would ensue). And blackberries, are synonymous with autumn... Once upon a time, I would have left my house with an old ice-cream tub, wandered down the lane, and, in no time, filled it with blackberries from the hedgerows... but that that was back in Blighty... Here, in my part of New Jersey, they don't grow with such free abandonment... and so, I have to make do with blackberries sold at the local farmers market... they're still local, but paid for, and I've not had the joy of picking them and popping a few (several) in my mouth along the way!


This recipe was originally taken from one of my old Sainsbury's calendars... I slightly adapted it to include more marzipan (have I mentioned that I love, love, love marzipan)... Seriously, I could just eat the whole packet in one go... no guilt... nothing! It's really easy to make and a nice tea time treat, with a cuppa. Mmmm, the taste of fall...


Anyhoo, I just wanted to share this recipe... just in case you had a glut of blackberries and apples and were looking for recipe ideas.
Take care.
Lx

Blackberry, Apple & Almond Cake Recipe


Ingredients
2 small apples (peeled, cored & thinly sliced)
100g blackberries
juice 1/2 lemon
100g marzipan (cut into small cubes)
100g unsalted butter (softened)
2 eggs (room temperature)
1 tsp almond extract
150g self raising flour
1/2 tsp baking powder
25g of flaked almonds

Method
Preheat oven to 160C / 320F. 
Grease and baseline a 8 inch cake tin.
Put the apples and blackberries in a bowl and squeeze over the lemon juice. Add the cubed marzipan to the fruit mixture and stir through.

Beat the butter and sugar until light and fluffy.
Add eggs, one at a time, beating well after each addition.
Add the almond extract and beat.
Add the flour and baking powder, combine thoroughly.

Spread half of the prepared cake mixture to the bottom of the cake tin.
Top with 3/4 of fruit mixture.
Layer the remaining cake mixture on top and the rest of the fruit.
Sprinkle the almonds over the top of the cake.

Bake in the oven for around 50 minutes or until the cake mixture is cooked through. (I check by sticking a knife into the centre and making sure it comes out clean).
Leave the cake to cool in the pan for 10 minutes and then turn out onto a plate.


Wednesday, May 2, 2012

A recipe for strawberry & rhubarb crumble...

Hello, hello-
Me again. I didn't leave it as long between visits this time, did I? I'm trying my very hardest to get back into my blog stride. So, today, I squeezed in a little *us* time between the laundry folding and bed. Don't you just hate laundry (I can see you're nodding right now)?


Anyhoo, I'm not about to get into a rant about my never-ending laundry pile, but if anyone knows how to resolve this conundrum (other than the kids walking around in their birthday suits), please let me know, because, today, I did a whole butt-load of laundry and yet, when I went to the girls' hamper at the end of the night, it was already back at the top again... I think they're hiding another puppy in the bottom of it.


Speaking of puppies... my little Lucy is off to be *fixed* this coming Thursday... to say I'm nervous is an understatement, but never mind me... poor, poor Lucy. She has no idea! One minute, she'll be merrily chewing bones and the next minute... well, we all know what happens...


On a brighter note, it does mean that she'll be convalescing for a few days and so, hopefully, with the wind knocked out of her sails, she might give me a break and stop stealing laundry... It wouldn't be so bad if she took it, never to be seen again, but, instead, I'm forever finding knickers (and the like) dotted all around this little old house... I'm back on laundry again, aren't I? Well, this post is not titled, 'Laundry,' so I best get onto the subject in question... Rhubarb!


I lurve rhubarb, so when I popped into my local farmer's market the other day and spied it on the shelf, I decided to rustle up a Rhubarb and Strawberry crumble.


Now, as a child, my mum typically made an Apple and Rhubarb crumble and, while it was delicious, I just love the combination of rhubarb and strawberry, as  the sweetness of the strawberry really balances out the tart rhubarb. Add the delicious buttery, crunchy topping and you have on your hands one pretty fantastic dessert.


Why don't you give it a whirl? I promise you won't be disappointed!

Here's Lucy blissfully unaware...
Oh, and while I remember, here's a picture of my Lucy Boo... Aww, if only she knew what was in store for her...
Take care all.
Lx


Rhubarb & Strawberry Crumble


Ingredients
4 sticks of rhubarb sliced into approx. 3 cm chunks
2 cups strawberries, stalks removed and sliced
2 tbsp vanilla sugar (use regular sugar if you don't have it)
2 tbsp water
1 1/2 cups (approx. 200g) of plain flour 
1 stick (114g) unsalted butter cut into cubes
1/2 cup (approx. 100g) of brown sugar


Method
Preheat the oven to 350F
Place the rhubarb chunks in a pan and add two tablespoons of water. Sprinkle with the vanilla sugar and place on the hob on a low heat, remove when the rhubarb starts to soften (don't allow it to stew, otherwise you'll end up with a rhubarb gloop). 
Transfer the rhubarb to a ovenproof dish, using a slotted spoon.
Sift the flour into a medium sized bowl, and add the butter. Rub the butter into the flour using your fingertips. When the flour and butter have been rubbed in, the mixture should look like bread crumbs. Stir the sugar into the flour mixture.
Add the sliced strawberries to your rhubarb and sprinkle with a little vanilla sugar. Spread the flour mixture over the top of the fruit, ensuring that all the fruit is covered.
Pop the crumble in the oven for 35-40 minutes. When finished the crumble top should have a lovely golden top.
Allow the crumble to cool for 10 minutes, as it comes out radioactive hot!! Serve with a scoop of vanilla ice-cream... Mmmmmm!


Tuesday, August 23, 2011

The best soup... ever...

Hello lovelies...
Well, it's coming to the end of summer and, I tell you, I'm looking forward to a bit of routine in my life... I look forward to the kiddies going to bed at a decent time so I can be reunited with my blog once more. As it is, I'm lucky to get a few snatched moments here and there, where I catch up on reading my favourite blogs. I have posts milling around my head, waiting to be tapped out... and then there are those that make it onto the old laptop but are endlessly awaiting pictures... But, hey, you know that this is not a five minute gig, so I'll quit my whinging and let you know what I'm up to...


As I tap this out, I'm getting ready for a Cabin trip. The hubby dictates that we need to go on this trip, as the Cabin is the only place we ever sit down, with nothing to do. Forced relaxation is imposed on me... mind you, I'm planning on taking the old sewing machine up with me, as I have a few projects that are about, oooh, six months overdue... at least I won't be doing endless laundry or cleaning...


Before I head off, though, I decided to do a spot of cooking... good old comfort food... soup, dips, quiche and scones.. The sort of food you can grab after a day spent at the pool, or the food you can tuck into while watching the rain pitter-patter in the woods... (this is a more likely scenario, as it has been raining buckets lately)...


Tomatoes are in abundance at this time of year (and these tomatoes taste of what tomatoes should, instead of the watery nothingness we get off-season)... so, this soup explodes with flavour in your mouth. It's the only soup my girls ask for and actually thank me for making (this is a biggie in this house, as meal times are most definitely a chore for my gals!). Served with a thick slice of bread, dripping with ooey-gooey cheese, meals don't get much better...


And so, this gal is taking herself off into the wilderness... apparently my in-laws spied two bears next to the Cabin only last week... the hubby told me this, all excited... I told him he'll be walking the dog solo!
Take care!
Lx

Tomato Soup Recipe


Ingredients
2 1/2 lbs of fresh tomatoes (try and pop in several varieties e.g. plum, vine, cherry)
6 cloves of garlic (peeled)
1 yellow onion (peeled & sliced)
1 red onion (peeled & sliced)
olive oil (approx. 1/4 cup... a few good glugs)
salt & fresh black pepper
2 tsp dried thyme
2 bay leaves
3/4 quart (750ml) chicken stock
4 tbsp butter
1/4 cup fresh basil

Method
Preheat the oven to 450F
Wash, core  and cut the tomatoes in half.
Spread the tomatoes, onions & garlic cloves in a baking pan. Drizzle with the olive oil, until well covered. Sprinkle with the thyme, add the bay leaves and season with the salt pepper. I like to get my hands in and mix it all together, to ensure everything is covered in the olive oil.
Roast for 30 minutes or until the onions have started to caramelize (this is my favourite part, as the house is filled with the most delicious aroma... bliss...).
Remove the roasting pan and transfer the contents to a large pan. Add the chicken stock and butter. Bring to the boil and then lower the heat and simmer for about 20 minutes.
Wash and dry the basil leaves and then add to the pot. Use an immersion blender to puree the soup.
Season with salt and pepper to taste and serve in warm bowls, with a sprig of basil for garnish and a lovely piece of ooey-gooey cheese on toast for dipping...


When taste-tested, two out of two children surveyed stated that this was 'The best soup ever!'

Shared with Sarah at A Beach Cottage - Good Life Wednesday... go check out her linky party and leave inspired.

Tuesday, August 2, 2011

An English gal's Strawberry Shortcake...

Strawberry shortcake is a big hit in my house... that would be the toy... I think it's a spin-off of a cartoon (aren't all toys these days??)... or, is this one of those toys that became so popular, it made it onto the screen?? Anyhoo, my girls love it, so we have, oohh at last count, at least eight of these lying around this little place. Usually strategically placed, so that I'll stand on them bare-footed and maximum damage is done to my poor dainty feet (perhaps these could be used in warfare??)...


Oh, and did I tell you (for anyone not lucky enough to have any of these beauties in the house), they smell delicious?  Apparently of strawberries...  you know, that kind of strawberry that candy tastes of... the bright red candy that can only come from a zillion E numbers and that is likely to give your kids the ability to climb walls.
Anyways, as I brushed the sleep from my eyes on Sunday morning, I was greeted with my eldest wielding said doll about an inch from my nose, declaring 'Mummy, want to play Strawberry Shortcake? You can be Plum'... my insides shrivelled... another day lost to the joys of Strawberry Shortcake...


Then, I had an even better idea (escape plan)... why not make a Strawberry Shortcake???... as in the dessert (not the doll). The fridge is brimming with strawberries at the moment... I'm a sucker for the BOGOF deals (buy-one-get-one-free), so this gave me the perfect opportunity to use some up and, thus, get the hubby off my back about wasting money and free some much needed space in the fridge.... The cherry on top, though, was that my daughter was super-excited about the prospect of actually eating strawberry shortcake... I then explained that we wouldn't be putting the actual Strawberry Shortcake doll in the cake... it did take a bit of the shine off the idea for her, but the deal was done!


Now, to me, when all's said and done, a Strawberry Shortcake looks a lot like a Victoria Sponge (well mine did, as I only had two of the required three cake tins)... but let's not argue about semantics... I'm in America now, so I'll call it a strawberry shortcake. So, I set about whipping this up... a lot of sugar.... oodles of cream...  fresh strawberries... how bad can this be??? The end result was a ruddy big cake!! It definitely put the weeny Victoria Sponge cake in its shadow... this monster was H-U-G-E!! I hope the kids like eating cake... all summer long... Which leads me to ponder, if Strawberry Shortcake were actually modelled on this sugary dessert, shouldn't she have the proportions of the Jolly Green Giant!!!
So, if you have the local neighbourhood coming over for a sweet bite, you should give this a bash!
Take care all!
Lx

 Strawberry Shortcake Recipe


1 1/2 cups of self-raising flour
1 1/2 cups of all purpose flour
2 cups of sugar
1 cup (2 sticks) unsalted butter (softened)
4 large eggs
1 cup of milk
1 teaspoon vanilla extract

For the filling
Strawberry jam 
2 cups of whipping cream
1/4 cup of vanilla sugar
4 cups of ripe strawberries, stem removed and quartered
2 tablespoons of sugar

Method
Preheat the oven to 350F
Grease and lightly flour 2 x 9 inch cake tins and line the bottom with grease-proof paper. (To make an authentic strawberry shortcake use 3 x cake tins)
In a small bowl combine the flours.
In a large bowl cream the butter until smooth, using an electric mixer on a medium speed.
Slowly add the sugar and beat until light and fluffy. 
Add the eggs one at a time, beating well after each addition.
Add the flours, alternating with the milk and the vanilla essence. Make sure they are all mixed together, but don't over beat... Just to make sure it's all mixed together, scrape down the bowl with a rubber spatula and give it one last stir!
Divide the cake batter between the cake tins and pop in the oven for approximately 30 mins or until a cake tester comes out clean, when inserted into the middle.
Leave the cakes to cool in the tin for an hour and then remove, and allow to cool completely on a wire rack.
Toss the strawberries in the 2 tablespoons of sugar and set aside.
Whip the cream up with sugar, using an electric whisk on a medium speed. When the cream mixture forms stiff peaks, stir in the prepared strawberries.
Take one of the cooled cakes and spread with strawberry jam, then spread the cream and strawberry mixture on top of the jam. 
Top with the second cake... it's looking pretty big now, eh?
Lightly dust the top of the cake with confectioners sugar...
Bobs-your-uncle... a ruddy big cake!

Wednesday, July 20, 2011

Pea & feta salad

Hi there,
So, what's new? Things are ticking along nicely here in this little old place. Each day drifting into another, and, before I know it, it's time to flip the calendar to yet another new month... the summer is slipping by and I feel as though it has only just begun.


A good indicator that I am in the thick of Summer is the fact that the farmers' market is brimming with fresh produce. Tomatoes so sweet, they may as well be candy... and don't even get me started on Jersey corn... for those not lucky enough to try it, I can only say that you have never tasted anything so lip-smackingly gorgeous... It's even worth getting it stuck in your teeth (anyone know how to eat corn off the cob elegantly, let me know). I used to think that the only thing to come out of New Jersey was 'The Jersey Shore' and 'The Sopranos,' but this is what Jersey should be remembered for... fresh produce... there's a reason it's called the 'Garden State,' you know... (and I thought that was just irony...)


Anyhoo, as I turned the Sainsbury's calender over into the month of July, I was greeted with this month's recipe of a broad bean salsa. Now,  I'm not sure if broad beans are known under a different name here in the States, but I never come across them in the supermarkets... so, never one to be defeated at the first hurdle, I decided to substitute beans with fresh peas... I was itching to use fresh peas in something and this gave me the perfect excuse. I also have an abundance of mint growing in the garden (no, I didn't plant it in the pot, and so, it's growing pretty rampant at the moment)... and feta just takes me back to summer holidays spent in Greece... happy days! So, with a tweak here and there, I created this pea & feta salad.


Anyhoo, this dish makes the perfect accompaniment to a burger off the barbie or just as a light lunch. So, if you're short on time, whip this little treat up. You can even try it with broad beans!
Take care all!
Lx

Recipe for Pea & Feta Salad


1 cup of fresh peas
1/2 red onion finely sliced
1 tbsp olive oil
1 handful of mint leaves finely sliced
grated zest & juice of 1/2 lemon
1 cup of cubed feta
pepper to taste


Method
Add the peas to a pan of boiling water and cook for 1 minute. Drain and refresh in cold water.
Put the peas in a bowl with onion, olive oil, mint, lemon zest and lemon juice. A grind of black pepper.
Stir in the feta.
Delish!


Monday, June 13, 2011

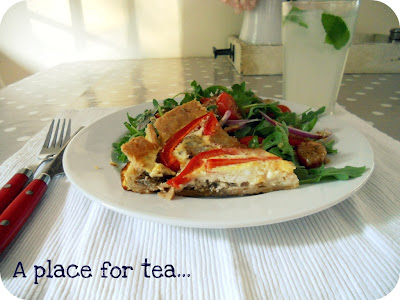
Goats Cheese & Red Pepper Quiche

There are some foods that are more powerful than their taste alone. In fact, some foods can be very bland in taste but still evoke a memory. A memory of happy times... and so, this becomes the reason why this food is in your repertoire. I have so many foods that fall into this category, whether it be the crispy skin of a jacket potato taking me back to bonfire night,  a vinegar soaked chip conjuring up images of rainy beaches and vinegar soaked chip paper, or simply, best butter on a freshly baked farmhouse loaf eaten at my granddad's seersucker covered table... all blissful times, relived in the first taste of these simple, yet delicious foods.


Now, this past week, the sun was shining and the girls were playing on the lawn, when my eldest asked for a picnic to be brought out. In my mind, I conjured up all manner of picnic foods... however, the girls were more than happy with cheesy puffs, turkey sandwiches, and grapes... Not me, though... once the seed had been sown, I had to make the perfect picnic food...and nothing says picnic to me like quiche...


When I was little, my mum would knock up a cheese and onion quiche in an afternoon... perfect to eat alfresco. This simple dish conjures up images of tartan blankets, wicker hampers, bowls of strawberries, elderflower cordial and hazy sunshine... Granted, life was probably not like that, and this is more likely a scene from Darling Buds of May (50's style feel-good sitcom), but you're getting the picture...
Anyhoo, quiches have evolved from the days of Quiche Lorraine, and much more sophisticated combinations are being put together. So, while I love the old school combos, I decided I'd bake a red pepper and goat's cheese quiche. I am a fiend for goat's cheese and feel I could eat it all day long, given the chance. So, being able to serve it up in quiche form, coupled with the sweetness of red pepper, is just pure bliss for me.


So, later that afternoon, I donned my pinny (apron), channelled my inner fifties house wife, and baked the perfect picnic food. Even the hubby (not a quiche fan) loved it. I savoured the salty goat's cheese juxtaposed against the sweet red pepper and red onion, all wrapped up in fluffy eggs and crusty pastry... Mmmm... If only I could have persuaded him to drag out the hamper and blanket onto the lawn... second thoughts, I think he'd have thought I was just plain barking...
I'd love to hear what your favourite summer / picnic food is. I could do with expanding my repertoire...
Take care all.
Lx

 Recipe for Goats Cheese & Red Pepper Quiche

Ingredients
25g butter
2 eggs
1 red onion,finely chopped  
280ml half & half or light cream
200g goats cheese (I used the kind with rind on but you can use crumbled too)
1 red bell pepper, deseeded and sliced length-ways

280g plain flour, plus extra for dusting
140g cold butter 
8 tbsp iced water

Method
  1. To make the pastry, tip the flour and butter into a bowl, then rub together with your fingertips until completely mixed and crumbly. Add approximately 8 tbsp iced water... just enough to bring everything together with your hands until just combined. Roll into the pastry into a ball. Try to handle the pastry as little as possible.
  2. Roll out the pastry on a lightly floured surface to a round about 5cm larger than your quiche dish / tin. Use your rolling pin to lift it up, then drape over the tart case so there is an overhang of pastry on the sides. Using a small ball of pastry scraps, push the pastry into the corners of the tin. By using the pastry to push into the corners, you'll prevent tears in your pastry case. Chill in the fridge or freezer for 20 mins. 
  3. Heat oven to 400F/200C/gas 6. While the pastry is chilling, heat the butter in a pan and cook the onion for approximately 20 mins, stirring occasionally, until they become sticky and golden. Remove from the heat.
  4. Lightly prick the base of the tart with a fork, line the tart case with a large circle of foil, then fill with baking beans (no baking beads, then use dried beans or rice). Blind-bake the tart for 20 mins, remove the foil and beans, then continue to cook for 5-10 mins until biscuit brown.
  5. Meanwhile, beat the eggs in a bowl, then gradually add the cream. Stir in the onions and half the goats cheese, then season with salt and pepper. Carefully tip the filling into the case (leave enough room for the peppers. Add the sliced red pepper and the rest of the goats cheese, then bake for 20-25 mins until set and golden. Leave to cool in the case, trim the edges of the pastry, then remove and serve in slices.

Wednesday, March 2, 2011

Egg custards, tea & a good old chin wag...


Hello there... yes, I'm still here... just!
So, I would love to report that the kitchen cabinets have been painted, hung, and dutifully adored, but, alas, I am a fickle girl... easily tempted by the beautiful Spring sunshine and the promise of warmer days... So, instead of painting this past weekend (as intended), I went for a bike ride... and it was lovely... so no apologies! The kitchen update at this point in time is they are all cleaned, sanded, and eagerly awaiting that first lick of paint... that, and the new kitchen dresser I procured the other day... Did I not mention that??

Picture taken from Craigslist
'It needs a lot of TLC, but I think it will fit in like a charm in my little kitchen'... These were the exact words I used to the hubby, as he rolled his eyes at the prospect of me taking on yet another project... Oh, and just in case you were wondering, the prints on the front will be going... Watch this space to see it transformed into something spectacular (cough, cough)...


Anyhoo, this week has entailed sanding kitchen cabinets, doctors visits, trailing across the Jersey Shore in search of the kitchen dresser, parents' evening at my eldest daughter's school, the usual Mummy duties, and a much needed cup of tea and natter with my ex-Pat chum...


She'd just been home to Blighty, and so, I needed filling in as to what is happening in my beloved home country... Are the shops all decked out for Spring and the Royal Wedding? What food did she eat? What was on the telly? Did she get the current issue of Country Living?? I bathed in her English experiences, hoping that, somehow, they would rub off on me... and, as I can't go to see a friend empty-handed, I also whipped up a batch of Egg Custards to go with the tea, and to help us pretend that we were having a good old chin-wag back in Blighty...

Egg Custards were one of my favourite desserts back home (England), but I've not been able to get them here in the States. So, my mum passed me the recipe, and, really, I don't know why I never made them in the past... they're so easy! As I'm super busy at the mo', I did cheat and buy the ready-made Graham Cracker cases (instead of making my own pastry) and, I have to say, they were quite yummy... I guess they were a little Americanised... just like me!
Take care all... I'm off to paint, sew, check Craigslist or something...
 Lx
 A Cheat's Egg Custard Tarts
Ingredients
2 Eggs
250ml milk
2 tablespoons of sugar (vanilla sugar if you have it)
grated nutmeg
6 small tart cases

Method
Preheat oven to 350F (180c)
To prepare the custard filling, whisk eggs separately, and bring the milk and sugar to the boil in a pan. Pour milk mixture onto the eggs and cool.
Pour the custard mixture into the tart cases and grate nutmeg on top over the tarts.
Pop the tarts in the oven for approximately 20 minutes or until the tarts have set.

I cheated and brought Graham Cracker cases (which were delicious), but if you're wanting a traditional Custard Tart, then follow the recipe above using shortcrust pastry tart cases.

Monday, February 7, 2011

An English Gal's Mexican Eggs...

So, this past Sunday was 'Superbowl Sunday'... now, as far as I can ascertain (in my house, anyway), this just means that we eat all day, and then watch American football. Breakfast was light (just a muffin), but we decided to push the boat out and eat brunch. I've got to say, brunch was something that passed me by in the UK. I was a breakfast, dinner, tea gal ('tea' being 'dinner' and 'dinner' being 'lunch'...get me? Nevermind, it's a northern thing)... every now and then, I would succumb to the old tummy rumblings and have 'Elevenses'... usually some bickies (cookies) or a pastry, but that's about as close as I got to brunch. On my arrival in the States, I found myself meeting people for 'brunch'... this newfound mealtime, where you could have either breakfast or lunch... or, in my mind, you could eat more and sleep in!


Anyhoo, originally, my favourite brunch dish was Eggs Benedict... the poached eggs then gradually gave way to Mexican Eggs... I then messed about with the ingredients at home, and 'Laura's Mexican Eggs' were born.

They always go down a treat... especially on lazy Sunday mornings.. There's quite a few ingredients in this dish, but it's worth it and, as it's lunch and breakfast, I think you can get away with it. So, this up and coming weekend, with romance in the air, why not dish up this sizzling treat to your loved one?... after all, apparently if you win over the stomach, you get the heart!


Take care all.
Lx

A Recipe for Mexican Eggs

Ingredients
mini tater tots or any fried potato product (two servings... you be the judge)
a handful of tortilla chips (I use multi grain)
1/2 a 15oz can of black beans, drained and rinsed
1 cup of grated cheddar
1 avocado, sliced
2 scallions, chopped
black bean & corn salsa (you can use regular salsa)
4 heaped teaspoons of sour cream
1 small carton of grape tomatoes, cut in half
1/4 cup of cilantro (coriander), chopped
4 eggs (I personally have one, but the hubby has two)

Method
Cook the tater tots (of other potato product like this... sauteed potatoes, potato crowns, mini hash browns etc.) as per the manufacturers instructions. Transfer to a oven proof dish.


Add the chips, black beans, scallions, avocado, chopped cilantro (reserve a small amount for garnish), and tomatoes, and cover with the grated cheddar.  Pop under the grill (broiler), until the cheese has melted and is bubbling...


While the dish is in the broiler, poach the eggs. To poach the eggs;  bring a medium size pan of water to boil. Add a tablespoon of vinegar to the water. When the water is bubbling gently, crack the egg into a small ramekin or bowl, gently slide the egg from the bowl into the water. (I use the freshest eggs, as these keep their shape better). Poach gently for  2 minutes for a runny yolk. Remove the eggs, one at a time, from water with a slotted spoon. I usually place on a plate and cover with a bowl to keep the eggs warm if they are ready before the dish is ready, but in an ideal world, they'll be ready at the same time!

Once the potato mixture has been removed from the grill, transfer it from the ovenproof dish onto warm plates. Add the poached eggs on top of each plate. Season with pepper and a sprinkling of the chopped cilantro. Add a couple of teaspoons (or more if you fancy) of the sour cream and the salsa.


Enjoy!

Shared at A Beach Cottage Good Life Wednesday, pop over for some inspiration!

Wednesday, January 26, 2011

Raspberry, White Chocolate & Almond Muffins

January is a month that drags... well, for me anyway. I feel as though January has 60 days... no, make that 90! This year, we have seen an exceptionally snowy start. In fact, the last time I saw green, green grass was Christmas day... and, this evening, we had thunder-snow again... and, boy, was it loud. The poor dog nearly shot up her own backside (sorry, but that's the best way to describe it)...

Anyhoo, with all this dastardly weather, I feel compelled to bake and cook... It's an almost primitive instinct... not unlike the squirrels I see gathering whatever they can in the garden (usually all the bird food I placed outside moments earlier). I get great comfort from the knowledge that I have multiple options readily available when asked the age old question, 'I'm hungry, what is there to eat?'... and, even though I might fall down in a zillion and one other categories, I know that, at least in this one, I'm keeping pace!


When the wind is howling outside and the snow is whirling around the street light, I get the most comfort from this little old house and it's little old oven. And, even though by many people's standards, it's not all that much to look at, I am thankful that it is warm, welcoming, and full of good food to eat...


Speaking of which, I whipped up a batch of muffins this morning and once my chief taster (the hubby) tried one, he promptly told me to share the recipe with you guys...  They're super easy to put together, and as I'm on a total raspberry kick at the moment, they are just the ticket. If you give these a try, let me know what you think of them.

Hope you're all having a great week. Catch you on Friday for a Friday Flower.
Lx

Raspberry, Almond & White Chocolate Muffins


 Ingredients

2 1/2 cups all purpose flour
1/2 cup brown sugar
1/2 cup ground almonds (I usually get slithered almonds and chop them in the blender for a course texture)
1 cup of raspberries
1 cup of white chocolate chips.
1 tablespoon baking powder
1/2 teaspoon salt
1 cup of milk
1/2 cup of butter (1 stick), melted
1 large egg
1 teaspoon almond extract

Method
Preheat the oven to 400F. Line 12 muffin pan cups with muffin cases.
In a large bowl, combine flour, sugar, ground almonds, baking powder, and salt.
In a medium bowl or jug, using a fork, beat the milk, melted butter, egg and almond extract until blended. Add to the flour mixture and stir until flour is just moistened. Stir in the raspberries and white chocolate chips, to the batter mixture.
Spoon batter into prepared muffin pans and bake until a toothpick inserted into the center, comes out clean.... approximately 20-25 minutes.
Remove muffins from the pan and cool on a wire rack.

Sunday, January 23, 2011

Blue Peter Special Recipe

Growing up, I was a pretty poor eater... in fact, my hubby would say that I still am... My mum was 'old school,' in that everything was baked from scratch and nothing went to waste. There were no meal choices... meals were dished up and eaten... no questions. I remember coming in from school during the winter months with the kitchen windows steamed up from the pots bubbling away on the stove top... On asking what what was for dinner, my mum would reply, "Dinner"... to which I would respond "Dinner?  What, dinner, dinner?"... you see, I hated 'Dinner' mid-week... dinner being 'meat and two veg'... When my mum would confirm that it was in fact 'Dinner, Dinner', my bottom lip would tremble and I would burst into tears... Can you imagine crying over meat and two veg? Ahhh, the troubles of an eight year old...
Anyhoo, when it was my birthday, my mum would cook an evening meal of my choice (no fancy eating out for me)... I had to wait a whole 365 days to chose the meal that I actually wanted, and it was always 'Blue Peter Special'... Now, what's this, I hear you ask? Well, to anyone not brought up in the 70's in the UK, Blue Peter was a kids show on the BBC... My mum felt that is was more educational than other children's television shows, and so, deemed it appropriate to watch... there were all sorts of craft segments (like making spaceships from washing-up liquid bottles) and a cooking segment... the poor hosts would cook live and would generally hash it up... burning or dropping something mid-scene... 
Anyways, I would furtively scribble down the recipes and ask my mum if we could make them... some we did... most we didn't, but this recipe stuck... it's my go-to meal... my 'had a bad day' meal... 'I need comfort' meal... This recipe, as stood me in good stead, and still does to this day, being an all round family favourite... and, it's even better now that I don't have to wait until my birthday to eat it.
So, if you want a quick supper meal, give it a try (it tastes delicious with a dash of Worcestershire sauce)... It sure would make me smile to know that others are eating my birthday meal!
Here's to the start of a great week!
Lx


A Recipe for Blue Peter Special


Ingredients
2lb potatoes peeled & diced small (I usually use approx. 4 baking potatoes)
1 large onion (chopped)
4 tomatoes chopped
1 tablespoon flour
4oz cheese (you can use more if you like it cheesy like me)
salt & pepper 
1 1/4 cup (300ml) of warm milk 
2 tablespoons butter chopped into small cubes
4 teaspoons of chopped parsley (I add a little more)


Method
Preheat the oven to 375F and grease an ovenproof dish. Add the diced potatoes, chopped tomatoes, chopped onion, grated cheese, chopped parsley and flour, and mix together.


Pour the warm milk over the top. Season with salt and pepper.
Place the pieces of butter on top of the mixture.


Cover with foil and pop in the oven for 30 minutes. Remove foil and cook for a further 40 minutes or until the top has nicely browned and the potatoes are cooked through.


This dish tastes delicious with a dash of Worcestershire sauce and is great reheated for a bit of supper... Mmmmm....
Related Posts with Thumbnails